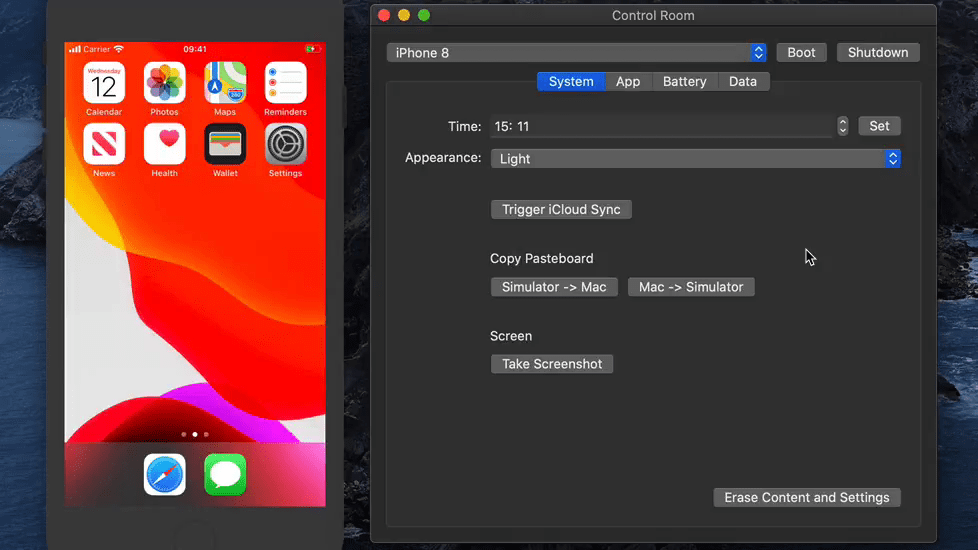
Control Room is a macOS app that lets you control the simulators for iOS, tvOS, and watchOS – their UI appearance, status bar configuration, and more. It wraps Apple’s own simctl command-line tool, so you’ll need Xcode installed.
Some features, such as sending example push notifications or move between light and dark mode, require Xcode 11.4 or later.
For a long time I always used the open command to open the Xcode project file contained inside React Native Projects.
bramus in ~/repos/projects/react-native/example
$ open ios/Example.xcodeproj
It wasn’t until I recently started a new React Native project that react-native init afterwards informed me to use xed instead.
The xed tool launches the Xcode application and opens the given documents, or opens a new untitled document, optionally with the contents of standard in.
With xed you don’t need to know the name of the project file. Just pass in the ios folder as an argument and it will handle things for you:
bramus in ~/repos/projects/react-native/example
$ xed ios
💁♂️ xed handles both workspaces (.xcworkspace) and regular project files (.xcodeproj) so no worries there 🙂
Furthermore, if you don’t want to remember yet another extra command, you can always add it as a script to your package.json:
{
…
"scripts": {
…
"xcode": "xed ios"
},
…
}
Did this help you out? Like what you see? Thank me with a coffee.
I don't do this for profit but a small one-time donation would surely put a smile on my face. Thanks!
Back in November, after 6 months of working on other projects, I picked up development for the EV-Point Mobile App again. The app is built using React Native and is available on both iOS and Android.
As Xcode got a new major release (from Xcode 9 to Xcode 10) since my last time working on the project I figured I’d trigger a new build on Bitrise, then see which errors would came at me, and continue from thereon. What I didn’t know however is that it would eventually take me 3 days, 17 failed builds, lots of Google Fu, and some guesswork to get everything working again. Here’s an overview of the biggest hurdles that I had to take, along with their solutions. I hope they might help you too.
There’s always a green light at the end of the build-pipeline tunnel …
My initial plan was to first get the current version of the app – still running React Native 0.53.3 – to build again in Xcode 10, and only then upgrade the React Native version to the latest one (0.57.4 at the time of writing). During the course of my journey I eventually flipped that around, as React Native 0.57.x already contained some fixes that I was in need of.
Problem #1: iOS: React Native project won’t build on Xcode 10
Of course my first Bitrise trigger using Xcode 10 would fail (but one can always try, right?). What I didn’t expect is that quite a lot of things were going wrong (REF):
Xcode Signing Issues
Failures indicating that libfishook.a could not be linked
Third party things such as glog that were not installed
etc.
As I stumbled from one build error into the other (locally, of course) and tried fixing these one by one, I eventually found that the most easy solution would be to upgrade to the latest RN version (0.57.4 at the time of writing) as it already contained most of the fixes.
Solution #1 (part1): Upgrading to the latest RN version
To upgrade to the latest RN version I used react-native-git-upgrade. I didn’t immediately jump from RN 0.53 to RN 0.57 though, but gradually went through all intermediate releases.
# install react-native-git-upgrade
yarn global add react-native-git-upgrade
# Go to project folder
cd ~/repos/evpoint/mobileapp/
# Upgrade to RN 0.54.4
react-native-git-upgrade 0.54.4
# Upgrade to RN 0.55.4
react-native-git-upgrade 0.55.4
# Upgrade to RN 0.56.1
react-native-git-upgrade 0.56.1
# Upgrade to RN 0.57.4
react-native-git-upgrade 0.57.4
Using react-native-git-upgrade to upgrade RN versions works like a charm, but it might will require you to resolve a few merge conflicts …
Upgrading from one React Native version to the other …
Once I performed all upgrades I tried building my app locally and … yes, great succes!
💁♂️ Note that when upgrading from RN 0.53 to 0.57, the Android build system will have migrated from Gradle 3 to Gradle 4. As we’re now focussing on getting iOS to build, we’ll skip this for now and tackle it later (see Problem #4 below)
Solution #1 (part2): Manually installing the third party scripts
UPDATE: This is fixed with the release of React Native 0.57.5 (#277c19c). You can skip this step if you’re running 0.57.5 or newer.
After successfully building locally I pushed my changes online in order for Bitrise to kick into action. Bitrise however failed. Hmmz …
- Build input file cannot be found: `./node_modules/react-native/Libraries/WebSocket/libfishook.a`
- `configure: error: in `(..._/node_modules/react-native/third-party/glog-0.3.4'`
- `✗ Build input file cannot be found: 'node_modules/react-native/third-party/double-conversion-1.1.6/src/strtod.cc'`
- `No member named '__rip' in '__darwin_arm_thread_state64'`
Turns out that there was an issue with third party scripts not getting installed correctly. Locally they were, however.
FYI: Locally it worked fine because – as it turns out – a second build would correctly struggle through it. As Bitrise always starts from scratch (e.g. with a non-existing node_modules folder) it couldn’t make it through.
To fix this I added an extra step in the build-pipeline to Manually install Third Party Scripts + Configure Glog, (REF):
#!/usr/bin/env bash -e
if [ ! -d "node_modules/react-native/third-party" ]; then
cd node_modules/react-native ; ./scripts/ios-install-third-party.sh ; cd ../../
cd node_modules/react-native/third-party/glog-0.3.5/ ; ./../../scripts/ios-configure-glog.sh ; cd ../../../../
fi
I’ve added this step right before Bitrise’s Certificate and Profile Installer step.
💡You’ll also need to execute this step locally, especially when starting from scratch. You can safely add this script to your local build-script as it contains a built-in check to not double install the Third Party Scripts in case they are already present.
~
Problem #2: Android: Program type already present: android.support.v4.app.ActionBarDrawerToggle$DelegateProvider
On Android I was still getting build errors though. My first one was something like this:
Error:Program type already present: android.support.v4.app.ActionBarDrawerToggle$DelegateProvider
java.lang.NoClassDefFoundError: Failed resolution of: android/support/v4/animation/AnimatorCompatHelper;
java.lang.NoSuchFieldError: No field notification_template_lines of type
Solution #2: Fixate the SDK version for com.android.support to a specific version
android {
…
// Fix for "Program type already present: android.support.v4.app.ActionBarDrawerToggle$DelegateProvider"
configurations.all {
resolutionStrategy.eachDependency { DependencyResolveDetails details ->
def requested = details.requested
if (requested.group == 'com.android.support') {
if (!requested.name.startsWith("multidex")
&& !requested.name.startsWith("exifinterface")) {
details.useVersion '24.2.1'
}
}
}
}
}
~
Problem #3: Android: Unable to find a matching configuration in project
When running ./gradlew assembleDebug I could successfully build for Android. Running ./gradlew assembleRelease however, yielded this error:
Unable to find a matching configuration of project :react-native-devsettings-android:
- Configuration 'debugApiElements':
- Required com.android.build.api.attributes.BuildTypeAttr 'preview' and found incompatible value 'debug'.
- Found com.android.build.api.attributes.VariantAttr 'debug' but wasn't required.
- Required com.android.build.gradle.internal.dependency.AndroidTypeAttr 'Aar' and found compatible value 'Aar'.
- Required org.gradle.usage 'java-api' and found compatible value 'java-api'.
- Configuration 'debugRuntimeElements':
- Required com.android.build.api.attributes.BuildTypeAttr 'preview' and found incompatible value 'debug'.
- Found com.android.build.api.attributes.VariantAttr 'debug' but wasn't required.
- Required com.android.build.gradle.internal.dependency.AndroidTypeAttr 'Aar' and found compatible value 'Aar'.
- Required org.gradle.usage 'java-api' and found incompatible value 'java-runtime'.
- Configuration 'releaseApiElements':
- Required com.android.build.api.attributes.BuildTypeAttr 'preview' and found incompatible value 'release'.
- Found com.android.build.api.attributes.VariantAttr 'release' but wasn't required.
- Required com.android.build.gradle.internal.dependency.AndroidTypeAttr 'Aar' and found compatible value 'Aar'.
- Required org.gradle.usage 'java-api' and found compatible value 'java-api'.
- Configuration 'releaseRuntimeElements':
- Required com.android.build.api.attributes.BuildTypeAttr 'preview' and found incompatible value 'release'.
- Found com.android.build.api.attributes.VariantAttr 'release' but wasn't required.
- Required com.android.build.gradle.internal.dependency.AndroidTypeAttr 'Aar' and found compatible value 'Aar'.
- Required org.gradle.usage 'java-api' and found incompatible value 'java-runtime'.
at org.gradle.internal.component.model.AbstractDependencyMetadata.selectConfigurationUsingAttributeMatching(AbstractDependencyMetadata.java:46)
at org.gradle.internal.component.model.LocalComponentDependencyMetadata.selectConfigurations(LocalComponentDependencyMetadata.java:90)
at org.gradle.internal.component.local.model.DslOriginDependencyMetadataWrapper.selectConfigurations(DslOriginDependencyMetadataWrapper.java:60)
at org.gradle.api.internal.artifacts.ivyservice.resolveengine.graph.builder.EdgeState.calculateTargetConfigurations(EdgeState.java:143)
... 89 more
Solution #3: Use matchingFallbacks
The fix was to adjust the defined buildType of debug so that it falls back to the release‘s buildType values in case one is missing. This can be done by using the matchingFallbacks instruction inside your app/android/build.gradle file (REF, REF):
Problem #4 Android: Execution failed for task ':react-native-config:verifyReleaseResources'
The final Android problem I encountered was that dependencies would not properly compile anymore with the change to Gradle 4. Packaged like react-native-config and react-native-devsettings-android would fail on their verifyReleaseResources step.
Solution #4: Upgrade packages and/or force subprojects to use same compileSdk/BuildTools as main project
Thankfully packages like react-native-confighave already landed fixes for this issue. Merely upgrading your affected dependencies using yarn will fix it.
If you’re using packages do not yet have fixes – like react-native-devsettings-android(ISSUE) – you can thankfully force them to use the correct compileSdk/BuildTools version from within your own android/build.gradle file (REF, REF):
subprojects {
…
// Force subprojects to use same compileSdk/BuildTools as main project
afterEvaluate {project ->
if (project.hasProperty("android")) {
android {
compileSdkVersion rootProject.ext.compileSdkVersion
buildToolsVersion rootProject.ext.buildToolsVersion
}
}
}
}
~
Furthermore I have a few classic issues – such as signing certificates that were expired – which I had to tackle. Supposedly the release of RN 0.58 – which I’m looking forward to – should no longer require the adjustment mentioned above.
Did this help you out? Like what you see? Thank me with a coffee.
I don't do this for profit but a small one-time donation would surely put a smile on my face. Thanks!
When recently publishing an app to the App Store (or at least trying to get it published back then), I couldn’t upload the app via the Application Loader. I got back ERROR ITMS-90717
“Invalid App Store Icon. The App Store Icon in the asset catalog in ‘Your.app’ can’t be transparent nor contain an alpha channel.”
You can also get a likewise warning later on in iTunes Connect, when uploading the “App Previews and Screenshots”
To easily fix this, you can use ImageMagick’s convert command to remove the alpha:
convert input.png -alpha off output.png
To convert all .png files in a folder, combine the command above with find:
Whilst initially implementing react-native-maps into a project I noticed that the iOS Simulator didn’t quite like it. Whenever the Mapview was visible on the screen, the Simulator was maxing out on something.
Turns out the OpenGLES.framework that comes with XCode 9.0 – and not react-native-maps itself – is the culprit. That version is buggy and makes the iPhone Simulator have issues when rendering hardware accelerated content (3D, Mapkit, etc).
Awaiting the release of XCode 9.1 – which contains a new and fixed version – there’s a workaround which involves using the OpenGLES.framework that came bundled with XCode 9.0 beta 3 (which isn’t affected). Full instructions on how to get an use this version are available as a Gist on GitHub.
⚠️ Installing frameworks/binaries from unfamiliar/untrusted resources always involves some risk. I can only say that I’ve been using the linked version without any issues. Your mileage may vary. Use at your own risk.
Did this help you out? Like what you see? Consider donating.
I don’t run ads on my blog nor do I do this for profit. A donation however would always put a smile on my face though. Thanks!
After the App Store automatically updated Xcode to version 7 (without me actually wanting this for now, but hey …) running ionic emulate ios -c -l would not do much anymore:
The app would launch but get stuck at the loading screen
No console.log() calls would be logged
Fixing it manually
To fix this, update the platforms/ios/projectname/projectname-Info.plist file with the following settings:
Add the snippet above at the end of the file, right before the closing </dict></plist>
Do note that you’ll have to (re)do this every time you run ionic platform add ios(which can happen when working in a team with multiple people)
Fixing it automatically
Alternatively you can use a before_emulate hook to have this change applied automatically before starting the iPhone Simulator.
Put the contents below in ./hooks/before_emulate/010_ios_allowarbitraryloads.sh
Make the script executable (chmod 755 ./hooks/before_emulate/010_ios_allowarbitraryloads.sh)
Every time you (or one of your teammates) runs ionic emulate ios it will check if the change in platforms/ios/projectname/projectname-Info.plist has already been made or not. If not, the settings are added.
#!/bin/bash
# Allow iPhone Simulator to make Arbitrary Loads
# @ref https://www.bram.us/2015/09/29/ionic-emulate-vs-xcode-7/
XCODEVERSION=`xcodebuild -version | grep Xcode | sed 's/Xcode //g'`
XCODEMAINVERSION=`echo $XCODEVERSION | cut -d "." -f 1`
PROJECTNAME=`xmllint --format --xpath "//*[local-name()='widget']/*[local-name()='name'][1]/text()" config.xml`
if [[ "$CORDOVA_PLATFORMS" == "ios" ]]
then
if [[ "$XCODEMAINVERSION" > 6 ]]
then
echo "iPhone Simulator (XCode $XCODEVERSION) is being used. We might need to adjust $PROJECTNAME-Info.plist to allow Arbitrary Loads!"
PLISTBUDDY="/usr/libexec/PlistBuddy"
TARGET="platforms/ios/$PROJECTNAME/$PROJECTNAME-Info.plist"
HASSETTING=`$PLISTBUDDY -c "print :NSAppTransportSecurity:NSAllowsArbitraryLoads" "$TARGET" 2>&1`
if [[ "$HASSETTING" == "true" ]]
then
echo " - NSAllowsArbitraryLoads already enabled. Not adjusting $PROJECTNAME-Info.plist"
else
echo " - NSAllowsArbitraryLoads not enabled. Adjusting $PROJECTNAME-Info.plist"
$PLISTBUDDY -c "Add :NSAppTransportSecurity dict" "$TARGET"
$PLISTBUDDY -c "Add :NSAppTransportSecurity:NSAllowsArbitraryLoads bool YES" "$TARGET"
fi
fi
fi
Did this help you out? Like what you see? Consider donating.
I don’t run ads on my blog nor do I do this for profit. A donation however would always put a smile on my face though. Thanks!
Xcode 5.0 introduced an interesting new feature: Quick Look for variables. Basically, it lets you inspect variables and their contents in a graphical way. Xcode 5.1 improves the feature even further with the addition of debugQuickLookObject. This method allows you to provide quick look content for any of your own classes. A bit like debugDescription but more advanced.
Using this, Inferis created an implementation which allows one to quick look at UIViews. Usage is really simple:
Just include UIView+DebugQuickLook.m into your project, and all your views automagically gain debugQuickLookObject.
Download the implementation directly, or install using CocoaPods:
pod 'UIView+DebugQuickLook', :git => 'https://github.com/Inferis/UIView-DebugQuickLook.git'
Great tech talk by the folks over at Ray Wenderlich on CocaoPods, the dependency manager for Objective-C. Be sure to click through on the link below as the original article contains a truckload of useful links.
Fresh OS X install, fresh XCode install, and starting the iPhone Simulator (without launching any custom app) quits at start-up and spits out a “The simulated application quit” error dialog.
Turns out the Asepsis feature from TotalFinder (the feature which prevents the creation of .DS_Store files) is the culprit. Disable that feature and all will work fine.