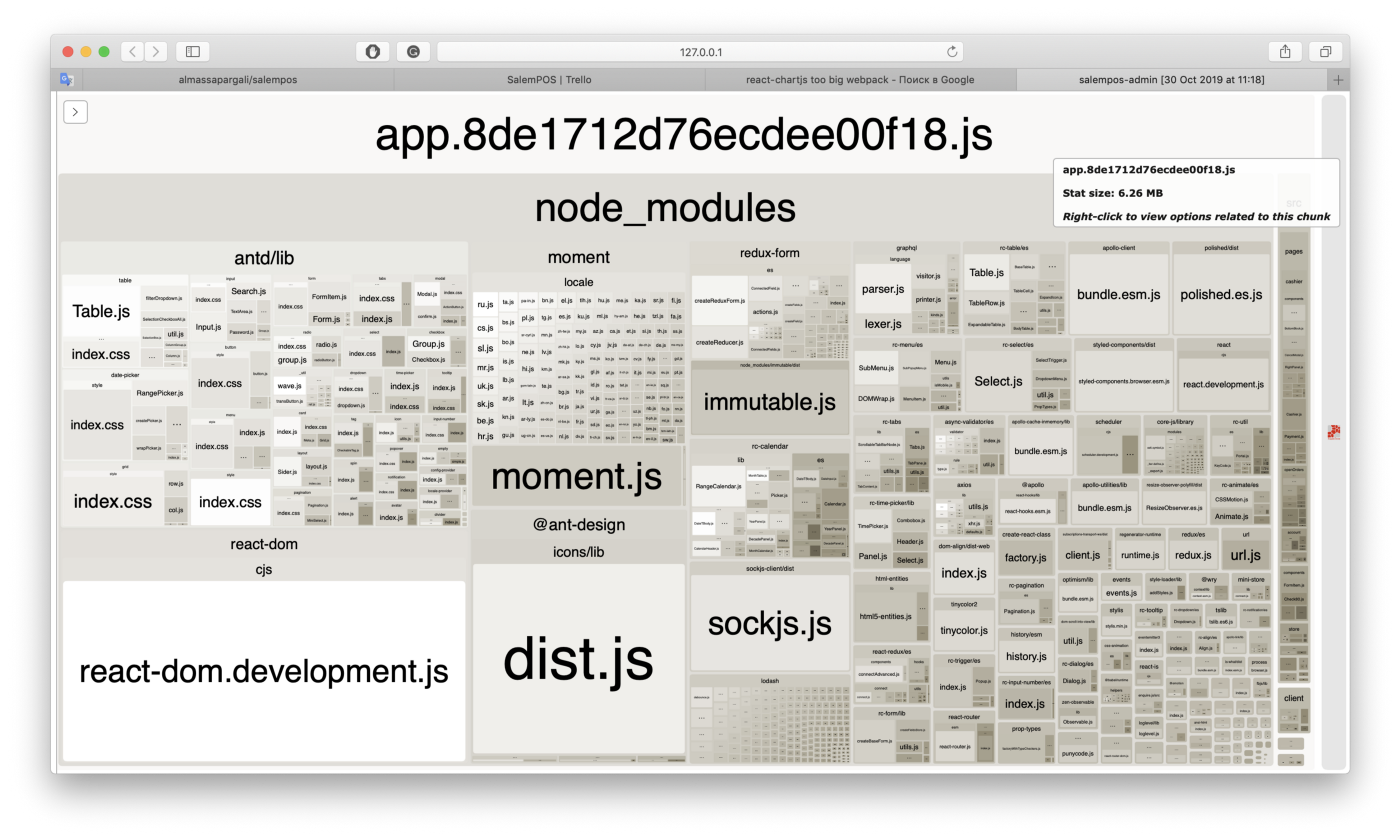
Gapur Kassym detailing the steps he took to reduce the bundle size of a webpack 4 project. You might pluck an idea or two from there π
Chrome Extension Webpack Boilerplate
If you ever want to create a Chrome Extension, this repo might come in handy:
A basic foundation boilerplate for rich Chrome Extensions using Webpack to help you write modular and modern Javascript code, load CSS easily and automatic reload the browser on code changes.
Introducing Federated Modules in Webpack 5
Want to share code dynamically between web applications but don’t want to use libraries or custom Micro-FE frameworks. Check out what’s in store for you with Webpack 5 and how federated modules will fundamentally change how you view web applications.
Webpack 5 Module Federation: A game-changer in JavaScript architecture →
Webpack 5 and Module Federation – A Microfrontend Revolution →
Ship legacy JavaScript and CSS files in a Webpack Project with webpack-merge-and-include-globally
One of the projects that I’m working on is quite reliant on jQuery and Bootstrap. As we’re introducing new features (such as a few React-based components, and Stylus for CSS) in said project, we’ve also introduced Webpack into it. Now, we don’t want to run jQuery nor Bootstrap through Babel (using Webpack), but we want to keep on shipping them untouched to the user.
However, we do want those files to βliveβ in our Webpack ecosystem. Basically we just want to concatenate those assets, so that we can ship one single legacy.js
and one legacy.css
file to the user. This is where webpack-merge-and-include-globally
comes into play:
Webpack plugin to merge your source files together into single file, to be included in
index.html
, and achieving same effect as you would by including them all separately through<script>
or<link>
.
Here’s how we use the plugin:
import webpack from 'webpack';
import MergeIntoSingleFilePlugin from 'webpack-merge-and-include-globally';
const config = (env) => ({
// β¦
plugins: [
// β¦
new MergeIntoSingleFilePlugin({
files: {
'js/legacy.js': [
'assets/js/libs/jquery-2.2.3.min.js',
'assets/js/libs/bootstrap.min.js',
'assets/js/libs/moment-with-locales.min.js',
'assets/js/libs/bootstrap-datetimepicker.min.js',
'assets/js/libs/ekko-lightbox.min.js',
'assets/js/scripts.js',
],
'css/legacy.css': [
'assets/css/libs/animate.min.css',
'assets/css/libs/bootstrap.min.css',
'assets/css/libs/bootstrap-datetimepicker.min.css',
'assets/css/libs/bootstrap-theme.min.css',
'assets/css/libs/ekko-lightbox.min.css',
'assets/css/screen.css',
],
},
}),
],
};
export default config;
With this in place we include legacy.js
and legacy.css
in the project to keep things working as they were before. Our βnewβ CSS and JS is written separately and is being ran through the entire Webpack build pipeline, like one would normally do. In the end we end up with four includes:
<!-- legacy files, concatenated -->
<script src="/js/legacy.js"></script>
<link rel="stylesheet" href="/css/legacy.css" />
<!-- our new files, compiled through Babel/Stylus/etc. -->
<script src="/js/app.js"></script>
<link rel="stylesheet" href="/css/styles.css" />
Installation per npm/yarn
yarn add -D webpack-merge-and-include-globally
π
Thank me with a coffee.
I don't do this for profit but a small one-time donation would surely put a smile on my face. Thanks!
To stay in the loop you can follow @bramus or follow @bramusblog on Twitter.
How to deploy your first site onto Netlify (+ basic configuration)
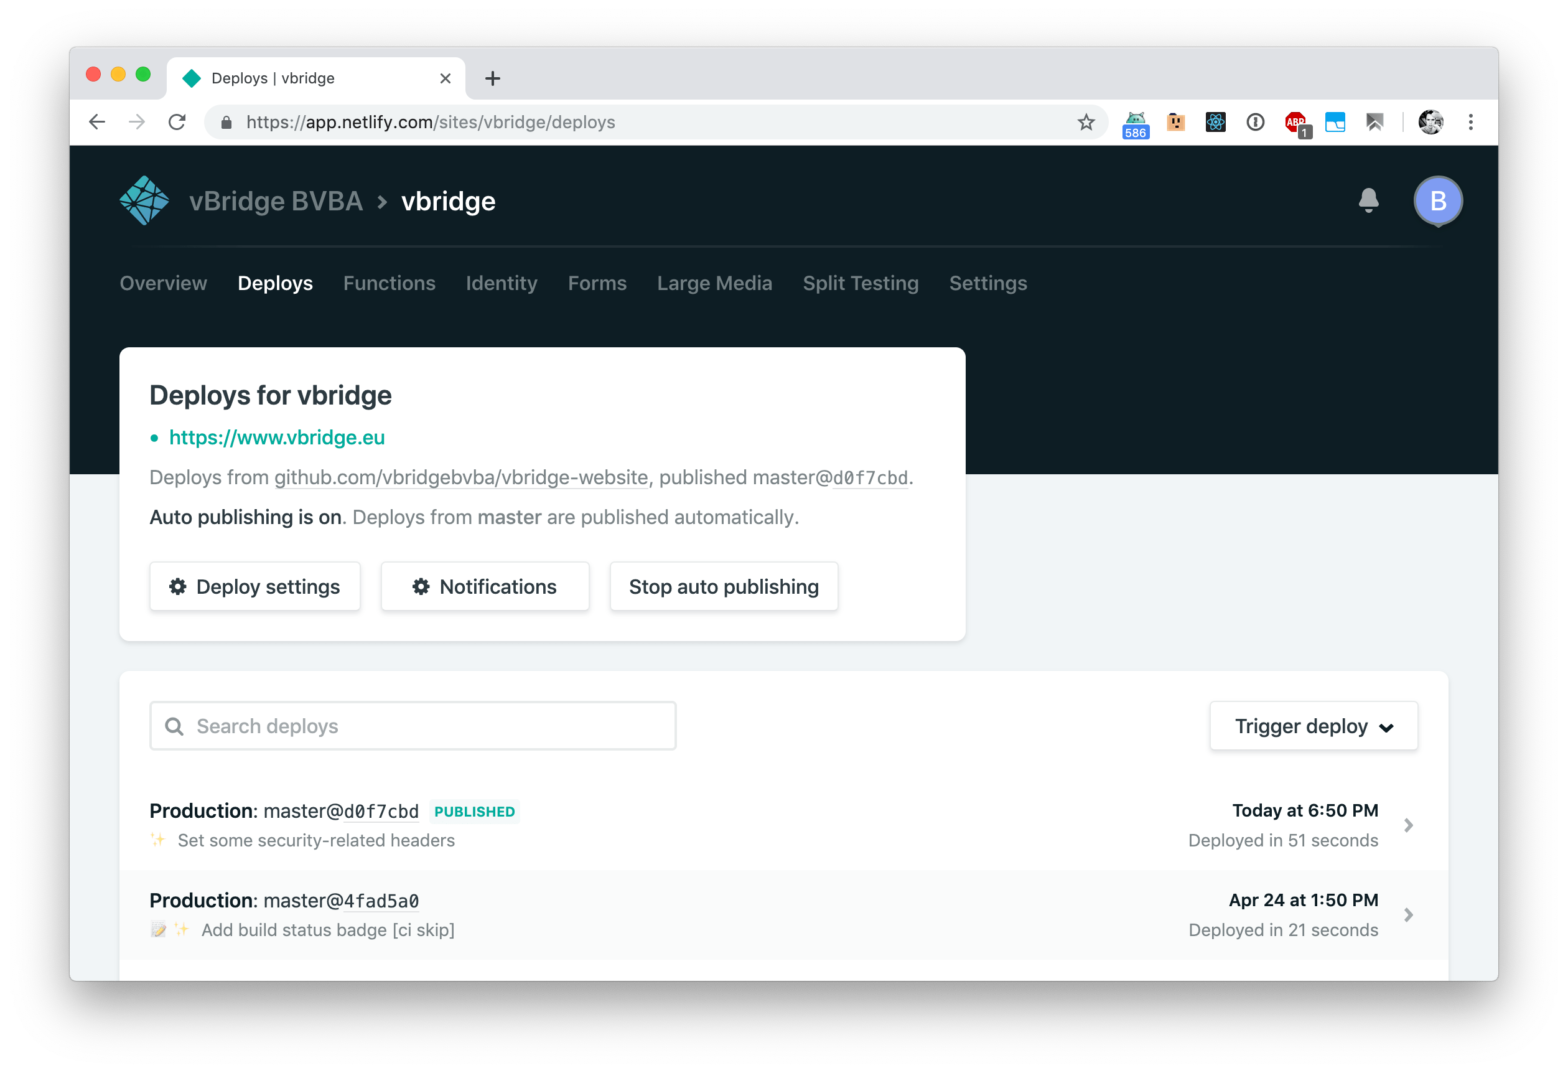
About two months ago I developed the website for vBridge, a new company I’m participating in. As the website consists of only one static placeholder-like page, I decided to look into hosting the page directly onto a CDN. Having heard a lot of good things about Netlify, I decided to check that out.
The site itself is built from its source through Webpack by calling yarn build
. Where I’d normally go for an external build service to build the site for me, and then deploy it from there into a bucket onto Google Cloud Storage or Amazon S3, Netlify allows me to remove this extra service in between as it has built-in support to building the source for me:
And best of all? Netlify is free (for basic sites), and supports Lambda Functions, and is configurable through a file named netlify.toml
.
Configuring Netlify trough netlify.toml
Before adding the site to Netlify itself, I added an instruction file named netlify.toml
in the root of the repo. This file tells Netlify what the build command is, which folder needs to be deployed, which redirects to perform, etc.
Here’s the full contents of my netlify.toml
configuration file:
[build]
publish = "build"
command = "yarn build"
[[redirects]]
from = "https://vbridge.netlify.com/*"
to = "https://www.vbridge.eu/:splat"
status = 301
force = true
[[headers]]
for = "/*"
[headers.values]
X-Frame-Options = "DENY"
X-XSS-Protection = "1; mode=block"
Referrer-Policy = "no-referrer"
X-Content-Type-Options = "nosniff"
Strict-Transport-Security = "max-age=63072000; includeSubDomains; preload"
Let’s break that down into several pieces:
-
[build] publish = "build" command = "yarn build"
This snippet tells Netlify what the build command is (
yarn build
), and which folder that needs to be deployed (build
). -
[[redirects]] from = "https://projectname.netlify.com/*" to = "https://www.domain.tld/:splat" status = 301 force = true
Whenever you deploy a project to Netlify, it will deploy it to a
projectname.netlify.com
subdomain. To prevent people from accessing the site through that subdomain, add this redirect instruction to yournetlify.toml
. The snippet is smart enough to retain the value of thepathname
when redirecting -
Additionally I also added some extra security headers. They are applied to all URLs (
"/*"
)[[headers]] for = "/*" [headers.values] X-Frame-Options = "DENY" X-XSS-Protection = "1; mode=block" Referrer-Policy = "no-referrer" X-Content-Type-Options = "nosniff" Strict-Transport-Security = "max-age=63072000; includeSubDomains; preload"
Further steps
After having added the netlify.toml
into the repo, one still needs to:
- Add the project to Netlify itself (see the video above)
- As your own domain is not pointing to Netlify yet, you might want to skip on that
[[redirect]]
part in yournetlify.toml
for now β¦
- As your own domain is not pointing to Netlify yet, you might want to skip on that
- Update DNS so that your own domain points to the Netlify servers (ref)
- Add/change
CNAME
record forwww
and point it toprojectname.netlify.com.
- Set
A
record to104.198.14.52
, or if your DNS provider supportsCNAME
Flattening,ANAME
, orALIAS
, alias the root domain toprojectname.netlify.com.
- Add/change
- Once DNS has propagated, Netlify will automatically enable HTTPS for your site: Netlify will automatically redirect non-https and non-www visits to
https://www.domain.tld/
- The
Strict-Transport-Security
header in mynetlify.toml
is a recommended extra on top of this, intended for browsers. By adding this, browsers will immediately request the site over HTTPS, even when the user types inhttp://β¦
first. See MDN’s page on HSTS for more info.
- The
And oh, if you want to create your own 404 page, just build a file named 404.html
and it will be used as the 404 page π
Thank me with a coffee.
I don't do this for profit but a small one-time donation would surely put a smile on my face. Thanks!
To stay in the loop you can follow @bramus or follow @bramusblog on Twitter.
pika/web β A Future Without Webpack
Interesting take on bundlers:
Over the last several years, JavaScript bundling has morphed from a production-only optimization into a required build step for most web applications. Whether you love this or hate it, itβs hard to deny that bundlers have added a ton of new complexity to web development β a field of development that has always taken pride in its view-source, easy-to-get-started ethos.
@pika/web is an attempt to free web development from the bundler requirement. In 2019, you should use a bundler because you want to, not because you need to.
Here’s how Pika does it:
@pika/web installs modern npm dependencies in a way that lets them run natively in the browser, even if they have dependencies themselves. No Browserify, Webpack or import maps required.
npm install && npx @pika/web β @pika/web installed web-native dependencies. [0.41s]
Pika does this by transforming all required packages into ES Modules, which are then stored in a web_modules
folder. Import your packages from said location and you’re good to go:
import {slugy} from './web_modules/slugy.js';
const textToSlug = 'Hello World, @pika/web!';
document.getElementById('slugy-text').innerHTML = `slugy("${textToSlug}") <br/>➡️ ${slugy(textToSlug)}`;
If your browser supports ES Modules, you can run the code snippet above directly in your browsers β no adjustments required π
Easier import
s with Webpack’s resolve.alias
One of the things I find annoying when using import
in my JS code is the fact that you need to refer to other local files using (relative) paths. Like so:
// Without resolve.alias π
import Modal from '../../../components/objects/modal/modal';
Having a background in PHP β where you have include paths and autoloaders β I essentially want the code to know that all components can be found in src/ui/components
, allowing me to freely move files around without needing to update the paths of all import
statements.
Turns out Webpack allows one to do exactly just that, using resolve.alias
:
const webpackConfig = {
resolve: {
alias: {
Components: path.resolve(__dirname, 'src/components/'),
Containers: path.resolve(__dirname, 'src/containers/')
},
β¦
},
β¦
}
With resolve.alias
in place, imports can now be written as such, regardless of the location of the file importing it:
// With resolve.alias π
import Modal from 'Components/objects/modal/modal';
Aaah, much better π
To not have to alias all folders, I’ve seen some people alias src/
to @
. That way they can import from @/Components/β¦
. Clever.
Consider donating.
I don’t run ads on my blog nor do I do this for profit. A donation however would always put a smile on my face though. Thanks!
Electron Webpack Dashboard
Ken Wheeler, who also created the aforementioned webpack-dashboard
, has now created an Electron based version:
The original
webpack-dashboard
, was fun and people seemed to like it. Unless they were on Windows, or used a weird terminal set up, or if they just wanted more.The original dashboard felt like working at NASA. 50 years ago. I hope this dashboard feels like working at NASA today. Or at Westworld. Or like the beginning of Westworld at least.
Introducing Electron Webpack Dashboard →electron-webpack-dashboard
Source (GitHub) →
Download electron-webpack-dashboard
→
Webpack Academy
Sean Larkin, one of the maintainers of Webpack, has started a video series to working with Webpack. The first course, entitled βThe Core Conceptsβ is available for free:
One of the biggest mysteries about webpack is how it works. As one of the maintainers of webpack, Sean Larkin is going to take you down a step by step process to not only understand how webpack works, but give what he believes are The Core Concepts.
More courses will follow, but will require a subscription/fee.
Introducing Webpack Academy! →
Webpack Academy: The Core Concepts →
The latest CSS-Tricks Screencast is also about Webpack (also featuring Sean Larkin):
Webpack Module Tree Visualizer
Visualize and analyze your Webpack bundle to see which modules are taking up space and which might be duplicates.
Generate JSON stats, and pass it into the online tool.
webpack --json > stats.json
You can also use the plugin locally if you want.