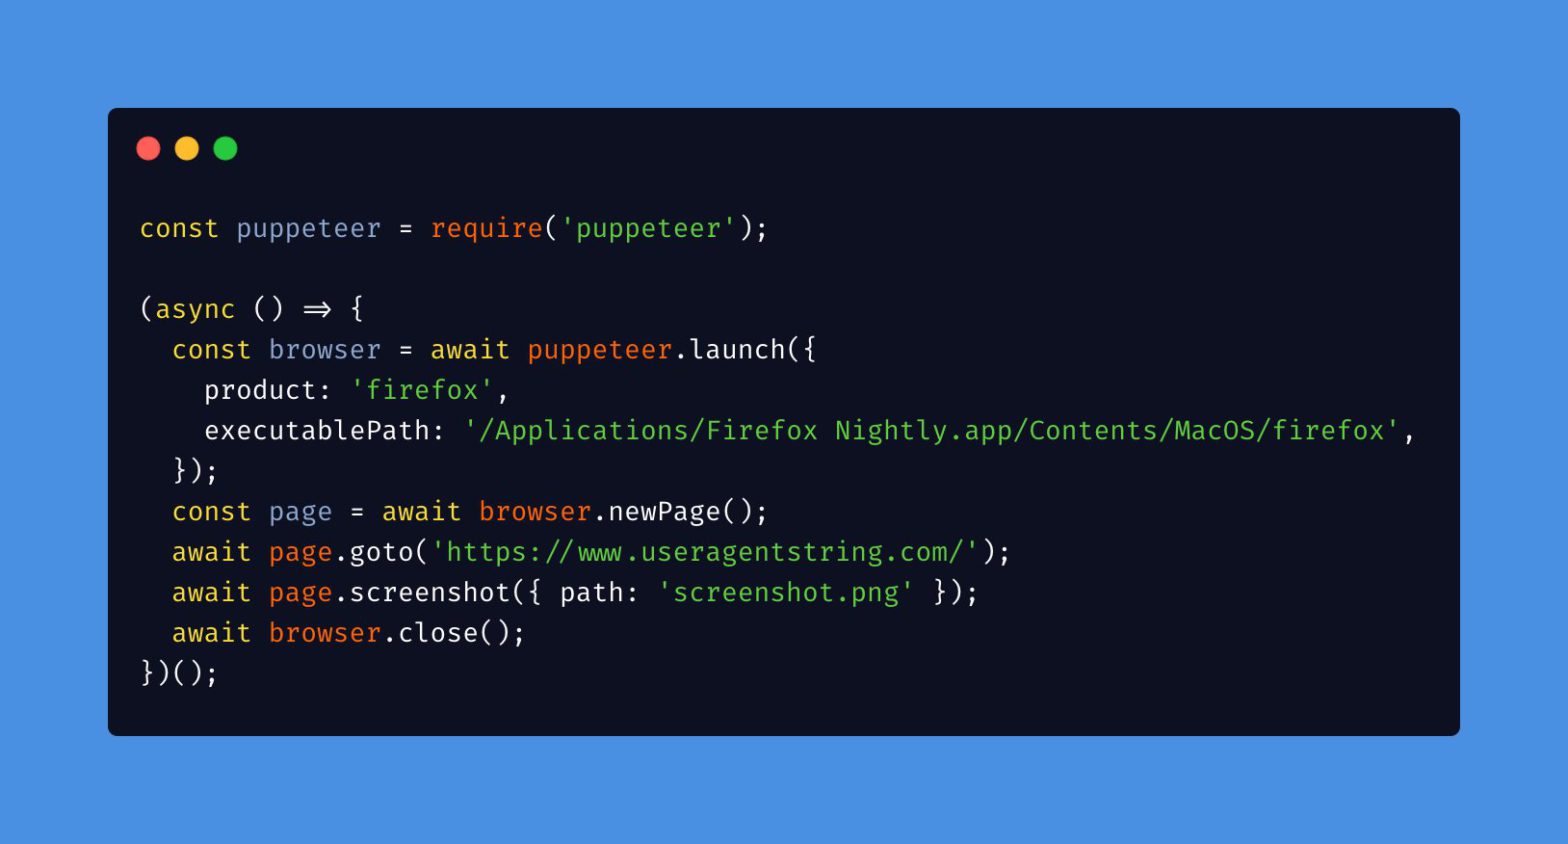
Nice work by Addy Osmani:
Puppeteer is a Node library which provides a high-level API to control headless Chrome or Chromium over the DevTools Protocol. This repository has recipes for automating Web Performance measurement with Puppeteer.
A rather geeky/technical weblog, est. 2001, by Bramus
Nice work by Addy Osmani:
Puppeteer is a Node library which provides a high-level API to control headless Chrome or Chromium over the DevTools Protocol. This repository has recipes for automating Web Performance measurement with Puppeteer.
Late January Puppeteer 2.1.0 got released, with native support for Firefox:
The launcher now has an option to run Puppeteer with different browsers, starting with Firefox. Puppeteer can now talk to a real, unpatched Firefox binary. This is a first step towards eventually deprecating the separate
puppeteer-firefox
package in favor of supporting Firefox directly in puppeteer itself.
You can define which browser to use by setting product
on the options
object to either "chrome"
or "firefox"
, or by setting the PUPPETEER_PRODUCT
env variable to one of those values.
puppeteer.launch({product: 'firefox'});
Installation still per NPM/Yarn
npm i puppeteer
Ire Aderinokun, author of the CanIUse Embed, has added an extra option where you can embed static images of features as mentioned on CanIUse.com. The images are generated using Puppeteer, are stored on Cloudinary, and are updated daily using Heroku Scheduler.
What I wanted to do was have a URL linking to an image (hosted on Cloudinary) that I would periodically update with the support table for that feature. For example, to get the latest image of CSS Grid support, anyone could use this URL:
https://caniuse.bitsofco.de/image/css-grid.png
A detailed writeup on how she created those images (and how she updates) takes you through the whole process.
How I created 488 “live images” →
πββοΈ You can also check CanIUse data using the command line tool caniuse-cmd
Here’s the source of a Google Cloud function that, using Puppeteer, takes a screenshot of a given website and store the resulting screenshot in a bucket on Google Cloud Storage:
const puppeteer = require('puppeteer');
const { Storage } = require('@google-cloud/storage');
const GOOGLE_CLOUD_PROJECT_ID = "screenshotapi";
const BUCKET_NAME = "screenshot-api-net";
exports.run = async (req, res) => {
res.setHeader("content-type", "application/json");
try {
const buffer = await takeScreenshot(req.body);
let screenshotUrl = await uploadToGoogleCloud(buffer, "screenshot.png");
res.status(200).send(JSON.stringify({
'screenshotUrl': screenshotUrl
}));
} catch(error) {
res.status(422).send(JSON.stringify({
error: error.message,
}));
}
};
async function uploadToGoogleCloud(buffer, filename) {
const storage = new Storage({
projectId: GOOGLE_CLOUD_PROJECT_ID,
});
const bucket = storage.bucket(BUCKET_NAME);
const file = bucket.file(filename);
await uploadBuffer(file, buffer, filename);
await file.makePublic();
return `https://${BUCKET_NAME}.storage.googleapis.com/${filename}`;
}
async function takeScreenshot(params) {
const browser = await puppeteer.launch({
args: ['--no-sandbox']
});
const page = await browser.newPage();
await page.goto(params.url, {waitUntil: 'networkidle2'});
const buffer = await page.screenshot();
await page.close();
await browser.close();
return buffer;
}
async function uploadBuffer(file, buffer, filename) {
return new Promise((resolve) => {
file.save(buffer, { destination: filename }, () => {
resolve();
});
})
}
Usage:
curl -X POST -d '{"url": "https://github.com"}' https://google-cloud-endpoint/my-function
Building a Website Screenshot API →
π‘ If I were to run this in production I’d extend the code to first check the presence of an existing screenshot in the bucket or not, and β if the screenshot is not too old β redirect to it.
dark-mode-screenshot
is a Puppeteer script to take screenshots of both the light and dark mode versions of a website.
$ npx dark-mode-screenshot --url https://googlechromelabs.github.io/dark-mode-toggle/demo/index.html --output screenshot --fullPage
Works in somewhat odd way first requiring the OS to have dark mode enabled (?), and then launch Chromium:
prefers-color-scheme
disabled (using --disable-blink-features=MediaQueryPrefersColorScheme
)--force-dark-mode
)dark-mode-screenshot
(GitHub) →
β New to Dark Mode? No worries, this post on CSS Color Scheme Queries has got you covered.
jest-puppeteer
With jest-puppeteer
β and its included expect-puppeteer
assertion library β it’s possible to use Puppeteer within your Jest tests.
Writing integration test can be done using Puppeteer API but it can be complicated and hard because API is not designed for testing.
To make it simpler, an
expectPage()
is automatically installed and available, it provides a lot of convenient methods, all documented inexpect-puppeteer
API.
describe('Google', () => {
beforeAll(async () => {
await page.goto('https://google.com')
})
it('should display "google" text on page', async () => {
expectPage().toMatch('google')
})
});
With expect-puppeteer
it’s also easy peasy to click buttons, complete forms, etc.
// Assert that a form will be filled
await expectPage().toFillForm('form[name="myForm"]', {
firstName: 'James',
lastName: 'Bond',
})
A few years ago we got Wraith and Huxley to perform visual regression testing. Monica Dinculescu has created a likewise thingy, powered by Puppeteer:
I did a little song-and-dance that sets up Puppeteer, takes screenshots of your app (like, all the routes you care about), and then compares them to the βgoldenβ ones. If they match, your test passes!
The diffing can be integrated in your current testing setup, as the testing scripts themselves are written using Mocha and Chai. The core of the script is the compareScreenshots
function, which checks all pixels of both screenshots, taking an allowed treshold/variance into account.
function compareScreenshots(fileName) {
return new Promise((resolve, reject) => {
const img1 = fs.createReadStream(`${testDir}/${fileName}.png`).pipe(new PNG()).on('parsed', doneReading);
const img2 = fs.createReadStream(`${goldenDir}/${fileName}.png`).pipe(new PNG()).on('parsed', doneReading);
let filesRead = 0;
function doneReading() {
// Wait until both files are read.
if (++filesRead < 2) return;
// The files should be the same size.
expect(img1.width, 'image widths are the same').equal(img2.width);
expect(img1.height, 'image heights are the same').equal(img2.height);
// Do the visual diff.
const diff = new PNG({width: img1.width, height: img2.height});
const numDiffPixels = pixelmatch(
img1.data, img2.data, diff.data, img1.width, img1.height,
{threshold: 0.1});
// The files should look the same.
expect(numDiffPixels, 'number of different pixels').equal(0);
resolve();
}
});
}
Keeping a feature of the Chrome Devtools β such as the FPS Meter β running with the DevTools closed unfortunately is not possible (yet?). Kayce Basques provides us with a little workaround though:
You can hack together a Puppeteer script that launches Chromium, opens a remote debugging client, then turns on the DevTools feature that you like (via the Chrome DevTools Protocol), without ever explicitly opening DevTools.
const page = await browser.newPage();
const devtoolsProtocolClient = await page.target().createCDPSession();
await devtoolsProtocolClient.send('Overlay.setShowFPSCounter', { show: true });
await page.goto('https://example.org/');
Check out Chrome DevTools Protocol View for an entire list of commands you can send.