![]() When writing a backend for a site combined with TinyMCE I’ve always found it a big hassle to visually link the content of the editor with the content of the actual site. Yeah yeah, there exists something like a
When writing a backend for a site combined with TinyMCE I’ve always found it a big hassle to visually link the content of the editor with the content of the actual site. Yeah yeah, there exists something like a content_css setting but that’s not really it as the options are limited. Fed up with this I decided to crank a nifty plugin out of my fingers …
All your styles are belong to content_css!
With the content_css setting one can actually set some styles on default elements. Font-size and line-height for paragraphs, bullets for the lists, colors for the headings, etc. When adding classes to that CSS file, TinyMCE will be smart enough to parse them out and add them to the styles dropdown lists in some plugins their dialogue window (the link and image dialogue for example).
Classes are parsed indeed … but those are classed meant for paragraphs and lists … :S
Yes, that’s a real nice start to visually linking the front- and backend of your site/app … but what when you want to provide some classes on non-link and non-image elements? What if you happen to have a class introText for your p elements? Or what if you have different classes for ul elements? How to add them without diving into the sourcecode? And what about that darn bug which allows one to add classes to links and images, even if the selector states that it’s for paragraphs only?!
Time for some action!
Given this problem I’ve been taking from project to project I finally was fed up with it I could take it no longer. One can of Coca-Cola (the non-diet version of course) and 15 minutes later the solution was there: write a plugin that takes a string which defines all allowed classes on certain elements and automatically enables the user to select one of those classes from a dropdown list when that element is selected within the editor. Easy, not? Easy indeed if I say so myself, as it’s not the first time I’ve written a plugin for TinyMCE (Note to self: have to write about that one any time soon …) and the TinyMCE Wiki holds a very nice article on writing your own TinyMCE plugins and the TinyMCE API is one big treasurechest!

Aaah, a Classic Coke!
First I thought of a simple string which holds all the info needed and which gets passed to the plugin. Format of that string is: “a semi-colon delimited string holding each element and its possible classes, separated by a comma between two square brackets”:
element1[class1_1,class1_2,class1_3];element2[class2_1];element3[class3_1,class3_2]
But then it hit me: what about list items? I don’t want to add class definitions to each list item individually, but to the full list. And when I’m using the editor the selected element will be the li itself, not the ul!
One braintwist later, the fix already was there: make it so that the string passed into the plugin contains this sequence of descendants. Not wanting to rely on the CSS Descendant Selector – which is a space – and not wanting to depend on the CSS Direct Child selector I decided to use a double colon for this as it would only confuse the user as they are no real selectors but logic structural xhtml sequences (an li always is inside an ul; why would you want to set the class of a p element to something special when you’ve got a strong element inside that p element selected?). Given this, the string passed into the plugin got changed to this:
element1::parentElementOfElement1[class1_1,class1_2,class1_3];element2::parentElementOfElement2[class2_1];element3::parentElementOfElement3[class3_1,class3_2]
For elements that do not rely on a parentElement I’ve decided to use self as the parentElementNodeName
A real life example would be:
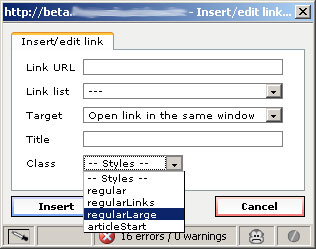
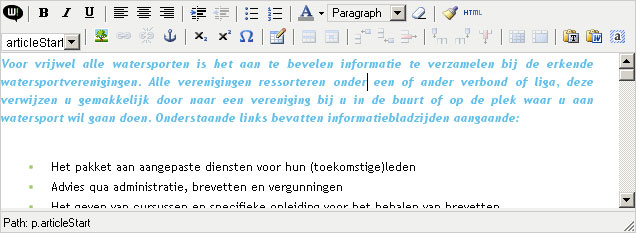
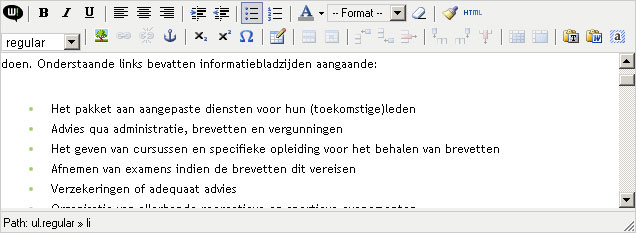
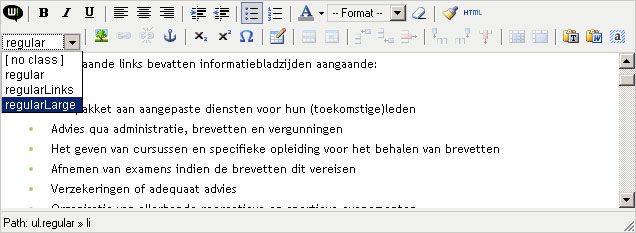
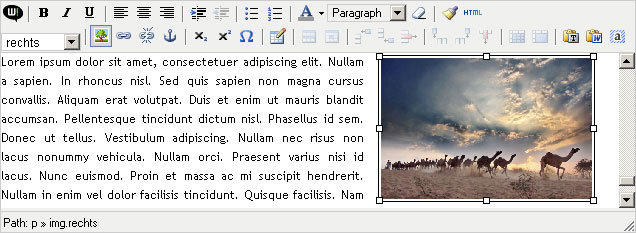
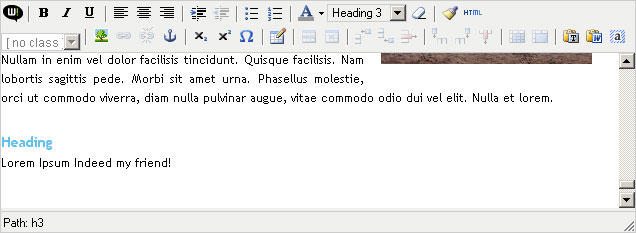
li::ul[regular,regularLinks,regularLarge];p::self[articleStart];img::self[left,right]
The string above lets you – when passed into the plugin I’ve written – to set regular & regularLinks & regularLarge as className on ul elements (yet an li element will be the current selected node inside the editor), articleStart as className on p elements and left & right as className on img elements
Nice idea … but does it work?
With the worked out idea in my head (and on paper, I tend to write stuff down when brainstorming) I was ready to make the catch of the day.

Won’t go into details on the code here, but what I can tell you is that:
- The TinyMCE Wiki is helpful, even when writing plugins.
- The TinyMCE API is a goldmine, waiting to get dugg out
- The source code of some of the default TinyMCE plugins are great studymaterials
- FireBug has and always will be necessary
- The
initInstance()function gets called for each loaded TinyMCE instance … be sure to not refill the same data over and over (as the plugin is loaded once, it’s easy to do a check if a private value is null (not inited yet:build var)or not (already inited:return;) - Don’t forget to assign unique ids to you elements you’re returning throug the
getControlHTML()function. You can use{$editor_id}to enforce this.
We want code!
As the code still is being tested heavily, and some documentation is being prepped, you’ll have to wait until the end of June (2007 that is) for the code to appear on the TinyMCE Plugins Page I’ve created right here at bram.us … yes I know, you’ll have to wait for it, but I just couldn’t keep you from learning about this plugin 😉
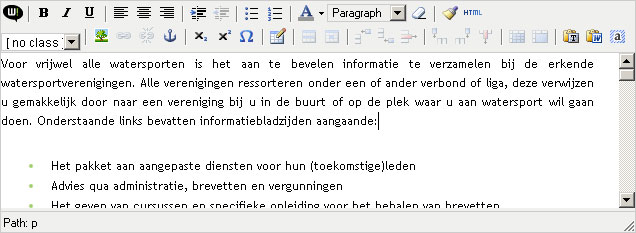
In the mean time, some screenshots though (look at both dropdowns along with the statusbar) 😉


Peace y’all … and don’t forget to check back by the end of June 😉
UPDATE 2007.06.27 : bramus_classeslist is dead and – even before it was ever released – got replaced by bramus_cssextras! 😉
Leave a comment