Overview
What is bramus_cssextras?
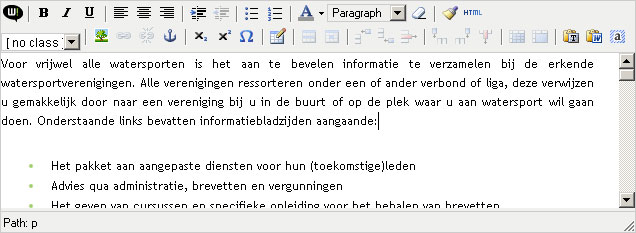
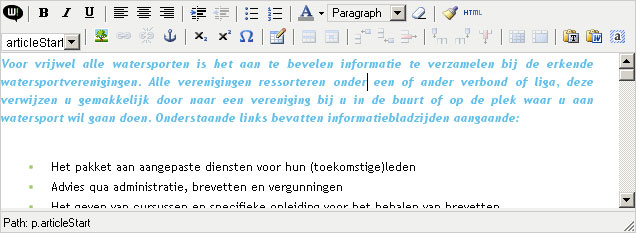
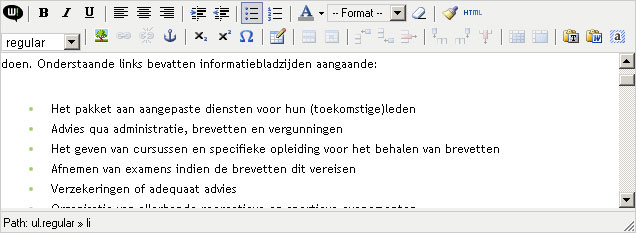
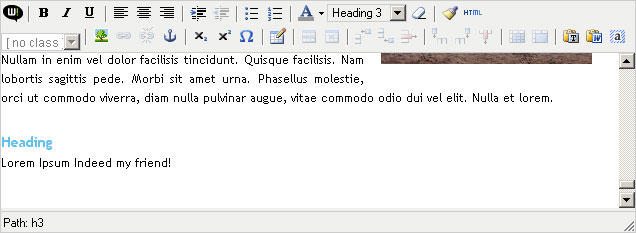
bramus_cssextras is a plugin for TinyMCE 3 which enables the usage of CSS classes and CSS ids on any HTML element within TinyMCE. Together with an external CSS file, set via the TinyMCE content_css setting, bramus_cssextras bridges the (visual) gap between the content entered through TinyMCE and the actual output; as seen below.
 vs. TinyMCE with content_css (2) vs. TinyMCE with content_css and bramus_cssextras (3)")
Plain TinyMCE vs. TinyMCE with content_css vs. TinyMCE with content_css and bramus_cssextras
Where content_css only lets you view the CSS styles applied on elements (and supports the setting of classes only on <a> elements), bramus_cssextras takes it to the next level by letting you set these CSS styles, based on CSS Class Selectors and CSS ID Selectors, on any element, giving the user more power on the visual representation then ever before (imagine one being able to choose 20 different classes or a handful of ids to apply on p elements with the ease of a click).
Screenshots & Demo
bramus_cssextras Demo (latest version)

bramus_cssextras Screenshots (outdated)
Screenshots might not say much at first, but take a peek at the status bar (bottom), the bramus_classeslist dropdown (2nd row, far left) and the block dropdown (1st row, right of the center)


Download
Latest Version (For use with TinyMCE 3.x)
All versions of bramus_cssextras can be downloaded from the bramus_cssextras GitHub page (click the Downloads button). Be sure to download the latest version (v0.5.4). The demo is also available on GitHub.
▼ Download bramus_cssextras from GitHub
▼ Download the bramus_cssextras demo from GitHub
Looking for a TinyMCE 2.x compatible version? Then download v 0.4.1 😉
Don’t forget to read the License & usage and Installation/Configuration blocks on this page! 😉
Version History
Version 0.5.4 – 2010.11.07
UPD: Switched License to a BSD License.
Version 0.5.3 – 2010.09.13
BUG: ‘selectDropDown’ is undefined when using GZIP
Version 0.5.2 – 2010.05.15
BUG: dropdown remained in place / wasn’t removed properly most of the timeUPD: back to using TinyMCE’s internal XHR object which didn’t make it into 0.5.1.
(turns out it was a bug in the TinyMCE version at the time that didn’t execute non-asynchronous (thus synchronous) ajax calls properly)
Version 0.5.1 – 2008.04.25
UPD: TinMCE 3.x Compatiblity updateUPD: Changed some internal calls to use the builtin TinyMCE helper functions (inArray & trim) to reduce the bramus_cssextras codebase
(didn’t use the XHR Object though as I experienced some probs with it)
Version 0.5.0- 2007.12.11
SYS: Rewrite for use with TinyMCE 3.x
Version 0.4.1 – 2007.11.22
FIX: When multiple CSS files are specified through content_css, load ‘m all and don’t break. (@see)FIX: If for examplep.testis defined multiple times, show “test” only once in the dropdown.
Version 0.4.0 – 2007.09.10
FIX: selection noclass returned “undefined” as class, now returns an empty stringADD: automatic building of thebramus_cssextras_classesstringandbramus_cssextras_idsstringby parsing thecontent_cssfile
Version 0.3.3 – 2007.07.27
FIX: getInfo returned wrong version. Fixed + version increment.
Version 0.3.2 – 2007.07.23 – * first public release! *
FIX: minor change in HTML output
Version 0.3.1 – 2007.06.28 (Unreleased)
ADD: extra check and confirm built in to enforce uniqueness of id attributes
Version 0.3 – 2007.06.27 (Unreleased)
ADD: setting of ids now possible tooSYS: name changed frombramus_classeslisttobramus_cssextras
Version 0.2 – 2007.06.22 (Unreleased)
ADD: bramus_classeslist now supports “Undo Levels”ADD: added a few extra comments (should be fully commented now)
Version 0.1 – 2007.06.19 (Unreleased)
- Initial Build
License & usage
The script is now released under a BSD license. Should you use the script within a commercial context please consider clicking the PayPal donate button below.
Installation/Configuration
Installation of bramus_cssextras is rather easy and can be split into 4 simple steps:
- Downloading and extracting the
bramus_cssextrasplugin - Preparing your
content_cssfile Building thebramus_cssextras_classesstringandbramus_cssextras_idsstring
As of version 0.4.0 this step is optional!- Adjusting the TinyMCE init to load the
bramus_cssextrasplugin
Downloading and extracting the bramus_cssextras plugin
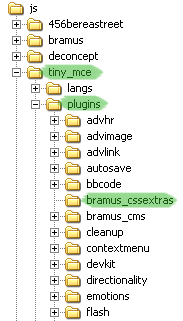
- Go download the latest copy of
bramus_cssextras - Extract the contents of that archive (including the directory structure inside!) to the
plugins/directory of your TinyMCE installation - You should end up with a path like this:
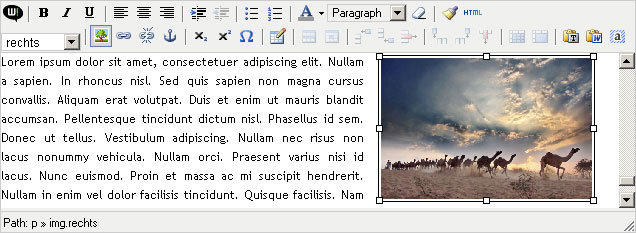
tiny_mce/plugins/bramus_cssextras/editor_plugin.js, as seen on the right (click to enlarge)
Preparing your content_css file
Let’s say we have a CSS file named mycontent.css with a few selectors in it:
a { /*...*/ }
img { /*...*/ }
img.floatLeft { /*...*/ }
img.floatRight { /*...*/ }
p { /*...*/ }
p#introText { /*...*/ }
h1 { /*...*/ }
h2 { /*...*/ }
ul { /*...*/ }
ul.smallList { /*...*/ }
ul.bigList { /*...*/ }
TIP: Don’t forget to add !important after color declarations, as Firefox won’t take them otherwise!
Now hook that CSS file to TinyMCE by using the content_css setting as described in the TinyMCE wiki, by adjusting your tinyMCE.init(); :
Make sure you link content_css to an absolute (or even full) path!
tinyMCE.init({
	...
	// hook the content.css
	content_css : "/mycontent.css",
	...
});
Building the bramus_cssextras_classesstring and bramus_cssextras_idsstring
As of version 0.4.0 this step is not needed anymore, as bramus_cssextras automatically builds these strings by loading in the specified content_css file via an Ajax call! Leaving this section here though, in case the automatic generation should fail.
Should you however not wish to stress your server with an Ajax call on each page load (that is if a TinyMCE instance is to be started), or if the content_css file is no longer subject to change then it is suggested to settings these parameters to a manually generated value as the automatic generation (and Ajax call) then will be bypassed..
If no ids or classes need to be set, then you can either exclude the button references (see next step) or set any of these 2 parameters to an empty string (viz. "")
The hardest part of the installation/configuration is building these strings (both are built in the same manner), which tells the plugin which classes and/or which ids on which elements can be applied. Before going into details on these strings, imagine this situation:
When one is editing an unordered list (viz. an
<ul>), he’s actually editing the list items (<li>) contained within that<ul>and he’d probably not want to set class or id definitions on each list item separately (in case of ids this even is invalid!), but he’d want to target the<ul>itself.
Given this problem, the bramus_cssextras_classesstring and bramus_cssextras_idsstring not only tell the plugin which elements to a apply classes/ids on, but also which elements their parent element to apply certain classes/ids on.
Not wanting to rely on the CSS Descendant Selector – which is a space – and not wanting to depend on the CSS Child Selector bramus_cssextras uses a custom made system, as it works the other way around (instead of targetting children/descendants it targets parent elements) and they are no real selectors but logic structural xhtml sequences (an li always is inside an ul; why would you want to set the class of a p element to something special when you’ve got a strong element inside that p element selected?)
Don’t worry if you can’t follow right now, an example will make it clear:
li::ul[smallList,bigList];img::self[floatLeft,floatRight]The string above tells bramus_cssextras that when an li is selected, the ul can have smallList or bigList applied on it as a class (when used as value for bramus_cssextras_classesstring of course)
For our CSS example file above, we’d define the bramus_cssextras_classesstring as so:
li::ul[smallList,bigList];img::self[floatLeft,floatRight]
The bramus_cssextras_idsstring would be defined as this:
p::self[introText]
After having built these string, one still has to inject them into TinyMCE by adjusting the tinyMCE.init();
tinyMCE.init({
	...
	// hook the content.css
	content_css : "/mycontent.css",

	// bramus_cssextras config
	bramus_cssextras_classesstring : "li::ul[smallList,bigList];img::self[floatLeft,floatRight]",
	bramus_cssextras_idsstring : "p::self[introText]",
	...
});
Adjusting the TinyMCE init to load the bramus_cssextras plugin and setting the parameters
Hooking bramus_cssextras to TinyMCE is really simple and consists of 2 steps:
- load the plugin
- add the button reference
A complete (and typical) tinyMCE.init(); would look like this:
tinyMCE.init({

	// advanced theme, target all textareas
	theme : "advanced",
	mode : "textareas",

	// load the bramus_cssextras plugin
	plugins : "bramus_cssextras", // note: of course you can still multiple plugins just as you're used to

	// add the bramus_cssextras dropdowns to the 2nd row of buttons
	theme_advanced_buttons1_add : "separator,bramus_cssextras_classes,bramus_cssextras_ids",

	// hook the content.css
	content_css : "/mycontent.css",

	// bramus_cssextras config
	// NOT NEEDED IN bramus_cssextras 0.4.0+
	// bramus_cssextras_classesstring : "li::ul[smallList,bigList];img::self[floatLeft,floatRight]",
	// bramus_cssextras_idsstring : "p::self[introText]",

	// move the toolbar to top, left aligned
	theme_advanced_toolbar_location : "top",
	theme_advanced_toolbar_align : "left",
	theme_advanced_statusbar_location : "bottom",

	debug : false
});Known Bugs
Not many 😛 :
bramus_cssextras 0.5.0+: When cancelling the setting of an id on an element when an element with that id already is present, the wrong value will remain selected in the dropdown.Fixed since 0.5.3bramus_cssextras 0.1+: Doesn’t play nice with the PHP GZIP Compressor (src) – UNVERIFIED
Current Limitations
The only limitations in effect are those when using the nested elements (viz. li::ul) and when having elements nested inside those elements, a few examples:
- When having an
a-element (or aspan-element, or astrong-element, or …) selected, which lives inside anli, you won’t be able to set the class on theul; the selected node really must be theli(you can see which node is selected in the TinyMCE status bar!) - When having classes targeted on the
ul(by usingli::ul) and also providing classes to apply on theli‘s themselves (by usingli::self), you’ll only see the first one you’ve declared in thebramus_classesliststring.
Feedback/Help/Support
One can always leave a comment in case any questions should arise or if a bug were to be found; and one can always support me by donating me a tidbit to my paypal 😉
Make a donation
It certainly is no obligation but it would most certainly put a smile on my face 😉 Alternatively you can support me by clicking one of the ads below.
i really like your screenshot composition (http://www.bram.us/wordpress/wp-content/uploads/2007/07/bramus_classeslist_visual.jpg) with the “textmarker-color clouds” and the big numbers.
but i miss the wordpress part in this post. and the part where it should say “download the WP plugin here, activate it and you are set”.
I’d been trying to wrap my brain around TinyMCE’s inability to correctly apply classes to uls for quite a while before finding your plugin. You’ve solved a couple of my immediate problems and opened up some other nice possibilities for streamlining my use of TinyMCE. Nicely done!
I would like to see this plugin select all the classes in available within the set content_css style sheet and list them with preview in a dropdown menu. So, you can set content_css to \”themes/”.$ThemeSel.”/style/style.css\”, and theme_advanced_styles to dynamically grab all available CSS classes.
Really great plugin, I just have one question.
Adding a style to a tag works perfect, but what when I want to remove the style again, if I select the first option in the option box”[no class]” I get something like “a.undefined”.
That is not a big problem but it would be nicer if it just removed the class.
@ Michael : is possible indeed when calling the content of the css file over XHR (ajax) and then letting some regular expressions run on it, yet will give some throubles for ul elements (for example, will give troubles on any element that needs to be contained within an other element) as that relies on the li element (unless that’s hardcode in the parsing script). Might give it a spin 😉
@ Marsman: Thanks for mentioning, will look into that.
@ Michael: Couldn’t help it and started coding … I’ve set up a test page which parses an given CSS file and automatically builds the
bramus_cssextras_classesstringandbramus_cssextras_idsstring. Will merge that functionality intobramus_cssextrassomewhere next week 😉Hi,
Where do i add this code:
tinyMCE.init({
…
// hook the content.css
content_css : “/mycontent.css”,
…
});
I can’t find a file to add this to…
Thanks for your help.
@Janice: better read the installation instructions for TinyMCE again, looks like you’ve missed an essential part of it 😉
The _loadContentCSS function doesn’t work when the content_css option is a list of URLs separated by commas. Maybe you shoud split(‘,’,content_css), take the first element, eventually strip it and only load that file. Or maybe load them all…
@ Martin: noted 😉
Hi I have a problem to view in tinymce a css (cascading style) like these:
example:
#container h1 { /* ... */ }
#content p { /* ... */ }
#menu table { /* ... */ }
@paul: most likely you don’t have anything in your TinyMCE instance that has the id container, or content, or menu … please note that your problem has nothing to do with bramus_cssextras, but with content_css 😉
@Bramus!: I thought that your plugin solve my problem.
My TinyMCE is in div with id container and when I create a css I use the structuce like this:
#container p { ….. } // tinymce is blind to this css I dont’` know why??
TinyMCE see only this css: why??
p { ….. } // tinymce is blind to this css
for example;
// tinymce scripts
.......
I dont`t want to create new css!!
Is this posible to view my css structure with your plugin or could you add it to your new version of plugin??
Don’t you understand paul? This “problem” isn’t one of bramus. By the way, thanks bramus. 🙂
@ redox: thanks 😉
How is this plugin different from the standard style selector?
@ Louis: bramus_cssextras is an intelligent script which adds 2 dropdowns to tinyMCE. Those dropdowns become active when an element is selected and only show the classes applicable to that kind of element. To original Tiny script which strips out classes, only lets you set them on a elements, even is those classes are set on p elements (for example).
great plugin bramus… the standart styleselect buildin doesnt do the job but yours does.
Still… I cant seem to get it work with the new beta of tinyMCE… version 3.0+. Is there any information on intregrating ur plugin with anything higher than the latest stable of tinymce?
@Sebastian: TinyMCE 3.0 (beta) is not supported at the moment. Will provide an update once TinyMCE 3.0 is released.
i worked it out… i’ve modified it so it works with 3.0… took me some time to figure it out tho. i’m testing right now. if ya want me to upload it for u or send it to you just contact me.
i really gotta repeat that: good job on that plugin, great idea.
@ Sebastian : tonight I’ve been working on
bramus_cssextras 0.5.0, a rewrite for use with TinyMCE 3.0. It’s not finished yet, but it’s shaping up nicely … stay tuned I’d say 😉I can’t seem to get this plugin working using the php gzip compressor. Is there anything that I need to change to get it to work?
Thanks.
Hi Fletch, I must say that I have no experience whatsoever with gzip compression, so I’m afraid I can’t help you out on this one …
That is too bad I would really like to use your plugin.
Thanks anyways.
Trying to get 0.4.1 to work within Joomla’s integration of TinyMCE (2.0.8.) I’ve followed all the steps here, but it does not seem to want to load, even with manually inserting the string values.
When you check TinyMCE’s “Help” link and “Plugins” tag, it only lists bramus_cssextras and no other info, like it is not running the jscript (but it is coded to load the plugin!)
Can you add a span tag nested in a tag.
ex Some Text Here
in my CSS i have this class
.red{color:#ff0000;}
With the TinyMCE class drop down you can highlight what you want changed and pick red from the drop down. All I see with yours is my id intro_text.
Can you do what I am asking??
Thanks.
Fletch, you need to define
span.red { }in your CSS File if you want theredclass to be selectable onspan-elements 😉Great plugin! I’m not sure but i think i found a bug in v0.4.1. At editor_plugin.js line 496 you set the className with node.className = toSetTo. This works well since tinymce doesn’t set his own classes like visualaid for td’s. if you set the class with tinyMCE.execCommand(“mceSetCSSClass”, false, toSetTo) this is no more a problem! I don’t know if newer versions are effetced.
@olaf: bramus_cssextras cannot handle multiple classnames as a single element dropdown (select element) cannot contain multiple selections …
But i would be pretty good to have it solved to give one element more than one class.
I have a image which can be positioned right (per class for float) now this image should have a border.
At the moment, i will have to create a class for float right and border and create a class with float right but without a border…
I would solve it like this, i have an extra row in tinymce for your plugin. First there are 2 select-boxes, one for id, one for class. But if one class is assigned, the plugin fade in a new select box for classes without the class which was alloctated yet.
What do you think about it? I would help you if you like.
Greetz
Max
What are the implications of the classes-dropdown-field (aka “bramus_cssextras_classes” button) being grayed out? It simple says “.class” and I’m unable to pull down the menu. It’s disabled it seems. I’m not using the cssextras_ids field and haven’t tried it yet.
The CSS “view” is loading fine, as I’m able to see all styled applied to my objects. And most of my classes in the called-upon css file are not reliant on the existence of a “container” or similar id’d element. They’re mostly just bare classes (.left {} for example). Any ideas here?
And of course, good stuff man. Thanks. It’s just what I envisioned needing. 🙂
@Redox: been working on a new version lately, yet Tiny seems to be giving me some headaches with TinyMCE’s propietary ListBox control (viz. the visually appealing dropdown). Thinking about writing my own ListBox control in order to bypass some troubles I ran into and to enable the selection of multiple classes.
@ Scott: that’s because
bramus_cssextrashasn’t found any classes that can be applied to the selected element. This is most likely due to the fact that you’re defining.introText(a normal class selector) without any form type selector. In order for it to show up (to apelement for example) you need to define both the element and class:p.introTextwill tellbramus_cssextras to adjust the dropdown (thebramus_cssextras_classesbutton as you name it) to holdintroTextwhen a p element is selected 😉Hi, Bram!
Big thanks for this usefull plugin!
I have just installed it in MODx CMS with TinyMCE as RTE and it works very well. I will recommend it to all my friends.
Best wishes,
Igor.
Thanks Igor 🙂
Hi Bramus,
Thanks for your plugin, it works, but I would like to know why your plugin don’t detect for example “p.introText” ?
thanks too for your answer,
Nico
Hi Bramus,
excuse me for my comment. I solved the problem.
Thanks again for your plugin,
Nico
Bramus, is there a way to display friendly CSS Class names, the same as TMCE?
Hi Bramus,
I really like the idea behind your plugin, it’s really that what I searched for. Sadly I can’t use it, because I found a bug with both Firefox (3.0.3 Linux and Windows) and IE (7).
You can try it yourself on your demo page.
With Fx:
1) Select the bird-image, .class shows ‘floatLeft’ now. Set the .class to .floatRight. The bird image looses focus (would be nice if it keeped the focus, but that’s not the prob), reselect the image and choose ‘floatLeft’ in the .class-dropdown. The dropdown does not close anymore and items remain the same even if you select other elements in the editor.
2) Another one pretty like the first one with the id: select the first paragraph (introText) and set it to [no id]. Select the second paragraph below the list and set the #id to introText. The ID-dropdown does not close.
with IE7:
try 1) and 2) from above. The behaviour is different, but still buggy.
Do You plan to fix these bugs or do You have a quick’n’dirty solution? I debugged a few hours but I hat to recognise that I know to few about tinymce-plugin development to fix this.
best regards
Rudy
Thanks for sharing this plugin! I will definitely use this plugin on all my CMS systems! keep up the good work 😀
+1 on the bugs mentioned by Rudy.
Otherwise a great plug-in. Love the idea 🙂
I have a few styles that I would like applied to any tag. For instance:
.red { color: red; }
Currently, the .red style isn’t available through the bramus_cssextras_classes selector. Is there a way to enable that?
I know it will be included in the standard styles pull down TinyMCE provides. I’d like to integrate the two since having more than one style pull down will only confuse my users.
It seems that, if the plugin is declared after the “simple paste” plugin, it doesn’t work
ex :
plugins : “simplepaste,bramus_cssextras”,
Hey there! Really cool plug – BUT – I keep getting an error in both firefox and ie where i can select 1 class no problem, then when i select a second class in ie it throws a javascript error and freezes, and in firefox there are remnant lists (almost like the pulldown is not going away… I’ve tried just about everything and AM still leaving it in… lol
Thanks so much!
Joseph
Hi,
I have precisely the same problem as Joseph has as of March 20th. I haven’t yet found a solution to this.
Have you seen this problem before, Bram?
Best regards,
Jesper
My comment above is pretty much a duplicate of Ruby’s comment on October 5th
Best regards,
Jesper
Hey Bram, nice work on the plugin, appreciate it!
But there is an issue whereby the .class list div stays visible upon selection of an entry. I’m using firefox 3.0.10, and the bug does not present itself all the time, i cannot just reproduce it on demand.
It happens often though. Any thoughts?
@David – I’m getting it too. In fact, I get a second .class list div appended to the bottom of the original. The second appears and disappears correctly while the original stays open.
Very disappointed to see your cool plugin stop working, as I will have to remove it from TinyMCE.
My objective was simply to specify line heights using the TinyMCE WYSWIG editor. I googled and found this wasn’t so straightforward and came across your plugin. Im trying to integrate this into TinyMCE in the Concrete5 CMS. All code for the tinyMCE.init can go into a custom field inside Dashboard/sitewide settings/content toolbars of the C5 UI. I have followed the instructions above but I cannot see the bramus selectors in my editor. The css file i created, mce_content.css, resides in concrete/themes/default/mce_content.css where this is the default concrete 5 theme: Plain Yoghurt. I have specified the content_css path both with and without the “/” . I have also tried it both with and without the “_add” on “theme_advanced_buttons1”. So my TinyMCE custom toolbar code is;
theme : “advanced”,
plugins: “safari,spellchecker,pagebreak,style,layer,table,save,advhr,advimage,advlink,bramus_cssextras,emotions,iespell,inlinepopups,insertdatetime,preview,media,searchreplace,print,contextmenu,paste,directionality,fullscreen,noneditable,visualchars,nonbreaking,xhtmlxtras,template,imagemanager,filemanager”,
editor_selector : “advancedEditor”,
content_css : “/mce_content.css”,
spellchecker_languages : “+English=en”
theme_advanced_buttons1 : “undo,redo,|,styleselect,formatselect,fontsizeselect,fontselect,|,bramus_cssextras_classes,bramus_cssextras_ids”,
theme_advanced_buttons2 : “bold,italic,underline,strikethrough,|,justifyleft,justifycenter,justifyright,justifyfull,|,bullist,numlist,|,outdent,indent,blockquote,|,link,unlink,anchor,image,cleanup,code,|,forecolor,backcolor”,
theme_advanced_buttons3 : “tablecontrols,|,hr,removeformat,visualaid,|,sub,sup,|,insertdate,inserttime,|,ltr,rtl,|,help”,
theme_advanced_buttons4 : “charmap,emotions,iespell,media,advhr,|,fullscreen,preview,|,print,|,styleprops,spellchecker,|,cite,abbr,acronym,del,ins,attribs,|,visualchars,nonbreaking,template,blockquote,pagebreak,|,search,replace”,
theme_advanced_blockformats : “p,address,pre,h1,h2,h3,div,blockquote,cite”,
theme_advanced_toolbar_align : “left”,
theme_advanced_fonts : “Andale Mono=andale mono,times;Arial=arial,helvetica,sans-serif;/***/,zapf dingbats”,
theme_advanced_font_sizes : “1,2,3,4,5,6,7”,
theme_advanced_styles: “Note=ccm-note”
My css is just basic for test purposes;
a {color: #333333;}
img {padding: 2px;
border-top-width: 1px;
border-right-width: 1px;
border-bottom-width: 1px;
border-left-width: 1px;}
img.floatLeft {float: left;}
img.floatRight {float: right;}
ul.smallList {list-style:none; margin-left:0px; padding:0px; padding-left:24px; font-size:12px; }
ul.bigList {list-style:none; margin-left:0px; padding:0px; padding-left:24px; font-size:16px; }
Would like to solve this. If I still have trouble could you recommend an easier way in the existing TinyMCE functionality to have a dropdown menu to specify line height?
Appreciate some pointers.
I am also finding some errors and some menus staying open. Otherwise this is an excellent plugin. Its been a year since others have reported these problems. I don’t expect you to fix them. It would be great if you could tho! I will try and fix myself. Cheers, Dan.
Hi Dan.
Have you been able to fix the dropdown problem? I just checked back to see if any developments have been made. Seems it’s still up to the same old tricks…
Thanks,
Joseph
Hey guys,
I wonder, why nobody has found a solution for the problem with multiple entries in the menus, before. It was really annoying, so I spent 2 hours for fixing it. Here ist the…
+++++++++++++++++++++++++++++++
SOLUTION
+++++++++++++++++++++++++++++++
Just replace lines 552 to 556…
// render the selectdropdownselectDropDown.renderMenu();
// enable the selectbox!
selectDropDown.setDisabled(false);
…by:
// render the selectdropdowndocument.getElementById(selectDropDown.id).parentNode.innerHTML = selectDropDown.renderHTML();
// enable the selectbox!
selectDropDown.postRender();
selectDropDown.setDisabled(false);
———-
Works fine for me in all browsers. Please report on your experiences…
Greets
MoC
Having trouble with the styles drop-down menu “sticking” open. Is there a solution to this? It makes the plugin unusable. Happens on both Firefox and Safari (perhaps other browsers, too) on PC and Mac. I notice Bram hasn’t responded to any of the previous comments about this yet – Bram, are you out there? Do you want some money to fix this? Let me know how much you need – this issue is a major bummer.
Ya the drop down is messed…. its still usable. it just sticks, hit submit and make another change.
Master of Chess’ Solution Does not work…. it makes it worse in fact… or for me anyways.
Hey,
i found a dirty hack for the listbox menu error:
In the editor_plugin.js and within the “rebuildDropDown” menu add following lines of code:
if (document.getElementById(‘menu_ta_ta_bramus_cssextras_classes_dropdown_ta_menu’)) {
var el = document.getElementById(‘menu_ta_ta_bramus_cssextras_classes_dropdown_ta_menu’)
el.parentNode.removeChild(el);
}
if (document.getElementById(‘menu_ta_ta_bramus_cssextras_ids_dropdown_ta_menu’)) {
var el = document.getElementById(‘menu_ta_ta_bramus_cssextras_ids_dropdown_ta_menu’)
el.parentNode.removeChild(el);
}
this is not a good solution but works good for me.
Hi Bram,
I noticed someone posted this earlier, but i can’t seem to get this working with concrete5 any chance you can give us a run down on how to do so?
Thanks
Hi,
I just quickly tested the demo. If you use copy/paste you quickly get duplicate ID attributes in the DOM. Sorry, if this has been mentioned before, I only searched for “paste” on the page.
It is not possible to add a span style in any p tag when any p.class has been declared in the loaded css file.
I need to make something like this : some text span some more text
Any idea on how I could do this?
Hey, thanks for this great plugin!
I’m trying to get it to work with tables. But it doesn’t work.
in content.css I got:
table.simple{…}
table.simple td {…}
It will show up “simple” in the dropdown when table is selected but adding/removing doesn’t really work. Also sometimes it adds the class to the th instead of the table tag. Anyone experience same issue with tables?
I’ve spent some time making the plugin work with Umbraco 6, let me share my experiences.
1., create a folder at \Umbraco_Client\Tinymce3\Plugins\bramus_cssextras
2., drop your “editor_plugin.js” here, duplicate it, as “editor_plugin_src.js”
3., modify the \Config\TinyMceConfig.config
3.1 add a command under the commands xml node
<command>
<umbracoAlias>bramus_cssextras</umbracoAlias>
<icon>images/editor/formSelect.gif</icon>
<tinyMceCommand value=”” userInterface=”true” frontendCommand=”bramus_cssextras”>bramus_cssextras</tinyMceCommand>
<priority>77</priority>
</command>
3.2 add a plugin under the plugins xml node
<plugin loadOnFrontend=”false”>bramus_cssextras</plugin>
3.3 add the config keys to the customConfig xml node (these are the attribute-value pairs you would list under the tinyMCE.init function. make sure that you are adding the button to the correct theme, thus umbraco here)
<config key=”theme_umbraco_buttons1_add”>separator,bramus_cssextras_classes,bramus_cssextras_ids</config>
<config key=”content_css”>/css/editorial.css</config>
3.4 you must touch (change & save) your web.config to see the changes made to TinyMceConfig.config
3.5 go to the Developer section of the CMS, choose the “Richtext editor” data type, and enable the checkbox the newly added button in settings (looks like a small b/w dropdown)
3.6 go to a content node with a rich text editor and start using the plugin (you should see the class and id dropdowns by now)
a couple gotchas:
– if your richtext editor won’t show up, you haven’t added the _src suffix to the plugin, thus umbraco won’t find it, and can’t compress it. This will break the tinymce editor loading process.
– you can use the same editorial css that you are using for the default styles in mce
That’s all, I hope you found this useful
Any support for TinyMCE 4.x ?
This plugin is great, but not working with latest TinyMCE.